Archives for category: 2 Little Red Birds Exclusive

After my junior year in college I transferred to the University of Central Arkansas where I finished my degree.  It was closer to home and a good school.  The advisors there really helped me in figuring out what I wanted to do.  That being said I am a Sugar Bear and an alumni of UCA.  I was excited to learn that this year a cousin of mine decided to transfer to UCA to play football!  Now I’m a huge Razorback fan from my time spent at the U of A and I haven’t attended very many UCA football games in my lifetime, in fact I can probably count them on one hand.  So now that I have a good reason to go, I’m going to head to their home opener this weekend with the rest of my family to cheer on my cousin and the Bears!  In his honor, I made his parents a door hanger for them to take home — since in Oklahoma they don’t have much Central Arkansas gear.  I hand – painted the Bear face on a small birch pallet with acrylic.  I used several shades of grey starting with a pretty dark slate grey as the base. I layered the different colors and used different shades for some depth.  I also dry brushed with a black to give it a more worn feel.

IMG_8278 2

I’ve been been a little obsessed with making ornaments lately.  My Ornament Ideas board on Pinterest just seems to keep growing!  So I went and got a Wood Burning Tool from Lowes — it was a much better deal than at the craft stores and it’s a more comprehensive set.

grinchwoodornament.jpg
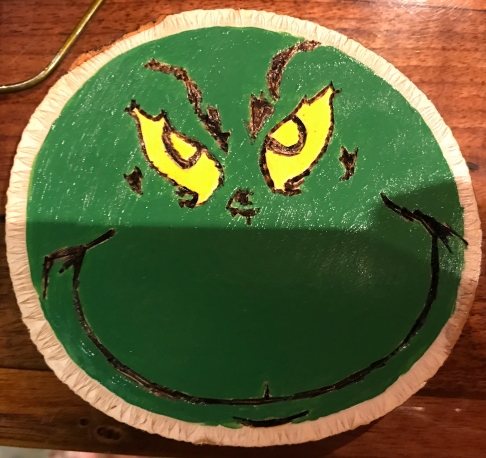
I’ve also been a big obsessed with the Grinch…I just love his face.  So I took a stab tonight at wood burning the Grinch on a wood slice.  On a side note: Wood slices……a good hardwood slice (about 4″ across) at Michaels is 2.99!!!  That is nuts!  I currently have my dad on a mission to find me a log that I can slice up myself!  Then it’s on like Donkey Kong.  But for now, I used my fun new tool and whipped out a Grinch.  I burned his face in first and then went back and hand painted him.   I love the texture the wood burning tool creates.   When he was done I put a think coat of lacquer on it to make it shiny.  All he needs now is a cute little hanger.

IMG_8126.JPGI’ve been out of pocket for a few.  I have been at my cousin’s wedding!  It was in Iowa and it was amazing and beautiful.  Out in the country at a barn on amid a field of soy beans with the reception at the small town community center.  There was nothing small town about this wedding though — it was rustic but amazingly beautiful and CHIC!!  It was just as beautiful as she is!  Here is a the tag I made for their gift.  I created the template with the Silhouette Cameo and then painted.  I went with the same light blue as the bridesmaids dresses.  I love the way it turned out.  Next time I want to try using a wood burning tool.

I never knew the 100th day of school was a thing until my kids started Elementary school. What is the 100th day of school and why is it special?? We didn’t do that when I was in school – so I did a little digging.

I found some fun information on verywell.com, see below:

What is the 100th Day of School?

The 100th day of school is literally the 100th day of the school year. More importantly, it is a great way for elementary school teachers to celebrate the various mathematical concepts that can be taught using the number 100. From the very first day of school, classes begin keeping track of the number of days they’ve been in school in anticipation of the 100th day. It’s this anticipation that is actually the first math lesson, as the days are often marked using coffee stirrers or Popsicle sticks, ten of which become a “ten bundle,” paving the way to counting by tens and ones.

When is the 100th Day of School?

The 100th day of school will vary from school to school, depending on when school started and whether or not there were days off for teacher workshops or inclement weather. Most classes end up celebrating the 100th day of school sometime in February, usually right around Valentine’s Day.

What Will my Child Do on the 100th Day of School?

There are hundreds of activities and lesson plans devoted to the 100th day of school and many books written to help celebrate the day.

At our school, only the Kindergartners celebrate the 100 days with a shirt. ONCE AGAIN, Pinterest to the rescue. There are TONS of ideas out there so it’s a fun activity with the kids to pick one. My daughter and son, of course, wanted very different things – my daughter is usually more complicated. Last year we went for buttons – and of course we just couldn’t place 100 buttons randomly on the shirt – it had to have a picture. We went with a flower! It’s not as easy as it seems to get EXACTLY 100 buttons into the shape of a flower. I recommend starting with the flower and ending with the stem and leaves. If you come up short you can always extend the stem or add a leaf!! For my son, we did a small 100 piece jigsaw puzzle – Star Wars, of course.

In 2015 I was looking for a unique gift to give to my Aunt and Uncle for their 30th wedding anniversary.  I did a search on Pinterest and found tons of ideas for gifts with made with pennies.  So I found 30 pennies — one for each year that they had been married.  I started with 1985 and found pennies all the way up to 2015.  Let’s be clear, I hope you have a LOT of pennies to go through, it might sound trivial, but it is a task to find all the years you need.   I found them all at my house, with the exception of 2.  I was missing 2002 and 2006, so I had to enlist at a friend at the bank to find pennies from those years.

Penny Anniversary

I used a teal colored piece of mat board for the back ground.  I arranged the 30 and used the extra pennies around the edges.  I cut out the Name and the Established using black on my Silhouette Cameo.  It’s not as easy as it looks to line up all the pennies into the formation you want.  I started in the top left-hand corner with 1985 and ended with the 2015 in the right-hand corner.  Be patient and find something you like.  Other cute ideas include the shape of a house or a heart.  This is a great gift for a 22nd anniversary since that is the Copper Anniversary.  Play with it and have fun!!!


I was out and about this weekend checking out “64 Galore” — a huge run of yard sales along Highway 64 in Arkansas.  Each year in August, a weekend is dedicated to a massive yard sale.  Hundreds of people set up their sales along the sides of the roads at churches and businesses, subdivisions have large neighborhood sales, flea markets and antique shops have sales.  The opportunities go on for miles.  While looking for something very specific (which I never actually found), I happened upon a flea market in Vilonia, Arkansas, where I found one of these:

buttermold

I thought it was very unique and I’d never seen anything like it before.  I asked the man at the counter what it was and he explained it was a butter mold.

Some quick facts about Butter Molds:

A butter mold makes butter more visually appealing for table use.  Old, primitive butter mold presses were made from wood and carved with a handle on the top and a flat bottom with a design carved on the underside. People pressed the design onto the top of the butter.

  • Pressed butter is a popular item at old-fashioned festivals and country fairs. Put the butter on the table for display but keep most of it in a cooler to prevent it from melting in the sun.
  • Most wooden butter molds were made of hardwood or maple.
  • The intricacy of the design can increase the value of the press. The most common designs were simple carvings such as wheat sheaths.

I bought one because I have a vision for this butter mold and what I can make out of it.  I can’t get to work on it. Wait and see what I turn this butter mold in to.  I hope the end result comes out as well as I can see it in my head.

I can’t believe that my little boy was born 8 years ago today!!!  Time goes by so fast!!  In honor of his birthday I wanted to do a little throw back to his 4th party — Dinosaur Train.  My son was a HUGE fan of the PBS Series, Dinosaur Train.  I admit, I went a little crazy.

Dinosaur Train

I painted Buddy and the Conductor on large foam core boards so that everyone could have their photos made with the characters.  Don’t worry, I didn’t free hand them, I drew the outlines with my trusty projector 🙂

The Cake & Tablescape

IMG_8694

For the tablescape I used just a plain green table cloth and an elevated platform for the ‘Cake’.  I admit, this could have been better, I should have draw in the tracks and added trees, etc. from my son’s train table.   I used various Train toys my son already had, including a Dinosaur Train, train and the Dinosaur Train characters.  I also attached balloons to train engine back in the corner.

Note:  The little cups with ranch and carrot and celery sticks….PERFECT for 4 year olds!!

The cake itself was so much fun to make and decorate.  I got the Nordic Ware Train Cake Pan  It makes little pieces, almost like cupcakes instead of a full out cake.

IMG_3179

It was so much fun decorating each little car with candy and frosting.  My son loved helping.  I used M&M’s, Peppermints, Gumdrops, skittles, Kisses, Sweet Tarts and so many other kinds of candy.  I then used black licorice to make the tracks. (They didn’t look the best, this is definitely something I would do differently)

And Finally….Something to Do

To keep the kids entertained, I created a Dinosaur Train ride.  I made my front porch into Pteranodon Station and gave everyone tickets to ride the “train” .  I hooked up a small trailer to our UTV and called it the Dinosaur Train.  Next, I took my trusty projector and made MANY dinosaur posters and placed them all about my property.  I let my son pick out all the types of dinosaurs he wanted to see and picked up a coloring book of dinosaurs at the dollar store to use with my projector.

Pteranadon Station

I also picked up some of the extra large plastic Easter eggs on clearance after Easter (see the pink one in the corner  of the porch above) and put white vinyl circle stickers all over them so they looked more like “Dinosaur” eggs. Instead of goodie bags,  I put fun swag in each one of them and there were enough that each child could find an egg! It made the party more interactive and also something 4 year olds could do.

Happy Birthday Buddy!!!

A couple of years ago, I got really interested in Zentangle. I like to draw, but I’m not very good at it. Zentangle is a mix of doodling and drawing and I found out that was right in my sweet spot. I found tons of designs on the interwebs and started doodling. I call it doodling with a purpose 😉 I even took a class at my local Hobby Lobby with Bethany Bennett, CZT, here in Arkansas. Taking what I learned, and also a fascination with Day of the Dead masks, I used some head shots of my friend’s children and basically doodled on them. I printed the photographs on white cardstock in black and white. Then I went to town with my Zentangle supplies, which basically comes down to various sizes of Sakura Pigma Micron Pens and Sharpies. You can create the designs in many colors, but I find myself being a purist and sticking to the straight black.

You can buy an actual Zentangle kit of pens here:

https://www.amazon.com/Sakura-Zentangle-11PC-Set-50011/dp/B007FEBJX6/ref=sr_1_13?s=arts-crafts&ie=UTF8&qid=1502218849&sr=1-13&keywords=zentangle

Or you can just collect the various sizes and colors you’d like to work with. Get an art box, you’ll end up with a zillion pens.

I love the results, they’re a little kooky and a bit different


If you’re interested in getting started with Zentangle – check out this site http://tanglepatterns.com/ I picked up so many ideas here. Later I’ll post on my sketch books and how I practice and store designs.

Last year I had the amazing opportunity to go on a Mediterranean cruise with my parents and friend. We traveled all over the Med from Barcelona à Nice à Florence and Tuscany à Rome à Naples and Capri à Venice à Croatia à Montenegro. Now I’ve previously been to Rome and Venice, but on this trip, I had the opportunity see many different things with exclusive Italian tour guides set up by my friend, Renee. I HIGHLY recommend Joe Bananas if you’re headed to Italy and would like to use private guides who know the language, the cities, history and the hidden gems at a VERY reasonable price.

Check them out here: https://www.joebananalimos.net/

I’ve seen amazing things all over the world, the temples in Nikko, Japan, the White Cliffs of Dover, the Louvre, the Swiss Alps – but this, is a must see in Rome! Our tour guide, Gianni, asked us if we wanted to see something cool.  Well who doesn’t want to see something cool? . So, he drove our minivan through the winding roads of what looked like a regular Roman neighborhood of villas. We just kept going up..up…up the hill. When we got to the top it was basically a large circle with a walled building type enclosure with some big blue double doors. Now there weren’t a lot of people up there, just a few people on Segway’s, but it didn’t seem like anything special. At the top, he told us to get out of the car and go over to the doors and look through the keyhole

Of course, we looked at him like he was a bit crazy, but a couple other people had just done it and well, as they say…….

When in Rome
 

Perfectly lined up with the keyhole….waaaaaaaaaaay off in the distance is the dome of St. Peter’s Basilica in Vatican City. It was totally amazing, and a little mind blowing.  This architectural marvel is a MUST SEE for your trip to Rome!

I found some information about it here (Excerpt below):

http://www.reidsitaly.com/destinations/lazio/rome/sights/knights_malta.html

A peek-a-boo view of St. Peter’s dome through the keyhole on the gate to the headquarters of the Knights of Malta on Rome’s Aventine Hill


View of St. Peter’s through the Cavalieri di Malta Keyhole. (Photo by Gary Arndt)

Peek through this keyhole on a piazza designed by Piranesi in 1765, and you will see a garden path that ends with bushes perfectly framing the dome of St. Peter’s in the distance.

What you are peering through are the gardens of the Villa del Priorato di Malta, one of the Rome properties of the famous Knights of Malta (I Cavalieri di Malta)—who are technically and more correctly called the Knights of St. John Hospitaler.

The knights left their late medieval home on the island of Malta long ago, and their headquarters are now here in Rome (if you’re curious, it is at Via Condotti 68, at the corner of Via Bocca di Leone near the Spanish Steps.) This Aventine villa is home to the Order’s ambassadors to Italy and the Holy See.

*Photos not attributed courtesy of Google Images, search Knights of Malta Keyhole

Not every sweet baby girl is going to be all ribbons and lace. Some girls grow up and want to wear camo and ride horses and be a rancher or a farmer. These baby girls will still love their pink and their bows, but they’ll want to hang out with the boys and ride four-wheelers and shoot guns and drive tractors. This is for the girl who not only can do everything the boys do, but they can beat them at their own games. So, for the future deer hunter I made this sweet teething rattle. Now, yes, I do realize that female deer rarely have antlers, but bear with me here. I wanted to create something for the future tomboy, but I also wanted everyone to remember she’s a sweet little girl. I looked for a sweet little fawn pattern, or something a bit more girly, but I didn’t find anything I liked.


Then, I found Rory….Rory the Reindeer….it’s a pattern for an ornament that I fo080617_0133_FortheFutur2.jpgund on www.ravelry.com.

Rory is a cute little guy and his pattern can be found here: http://www.ravelry.com/patterns/library/rory-the-reindeer-ornament

I used brown and black safety eyes and a safety nose. I also ordered the following rings from Amazon: https://www.amazon.com/gp/product/B01MS6BJ3R/ref=oh_aui_detailpage_o00_s01?ie=UTF8&psc=1 I prefer the all-natural wood rings for teethers instead of something plastic. I also prefer the bigger rings than you can traditionally get at Hobby Lobby or Michaels. This one is 3.7″ and I got it from Amazon. (If you keep up with 2LittleRedBirds you’d know that I’m a bit of an Amazon Prime addict.) It’s still plenty light for an infant but it’s much better with the size of the head and makes for better balance. I also recommend these rattle inserts https://www.amazon.com/gp/product/B00SKLWG0S/ref=oh_aui_detailpage_o00_s01?ie=UTF8&psc=1 I used 2 inside the teether so that it made a loud enough rattle.  So for the Future Tomboy I give you this sweet deer teether/rattler.